MadMapper 6 Timeline Explained: Scenes, Cues, and How to Actually Run a Show
The timeline is where most MadMapper users plateau. They get comfortable with surfaces, media, and basic scenes — and then they hit the point where they need to build something structured, repeatable, and reliable for a real show. That is when the gaps appear.
When MadMapper 6 dropped, the timeline was the first thing that stopped me. It completely changed my workflow. I want to explain why — and how to think about timeline programming correctly from the start.
The Difference Between Mapping and Running a Show
The difference between someone who can do projection mapping and someone who can run a show is the same as the difference between the actor and the director of a film. The actor performs a moment. The director controls every moment — in sequence, with intention, with a structure that holds together under pressure.
Timeline is what turns you from the actor into the director.
Without timeline, you are triggering clips manually, improvising transitions, and hoping the show holds together. With timeline, every cue fires at the right moment, every scene transitions cleanly, and your show is the same quality at the end of a four-hour event as it was at the beginning.
Understanding Scenes and Cues First
Before the timeline makes sense, scenes and cues need to be solid. In MadMapper, a scene is a saved state of your project — which surfaces are active, which media is playing, what effects are applied. A cue is a trigger that moves you from one state to another.
Think of scenes as the chapters of your show and cues as the page turns. You can trigger cues manually during a live performance, or you can lock them into a timeline and let the software drive the show.
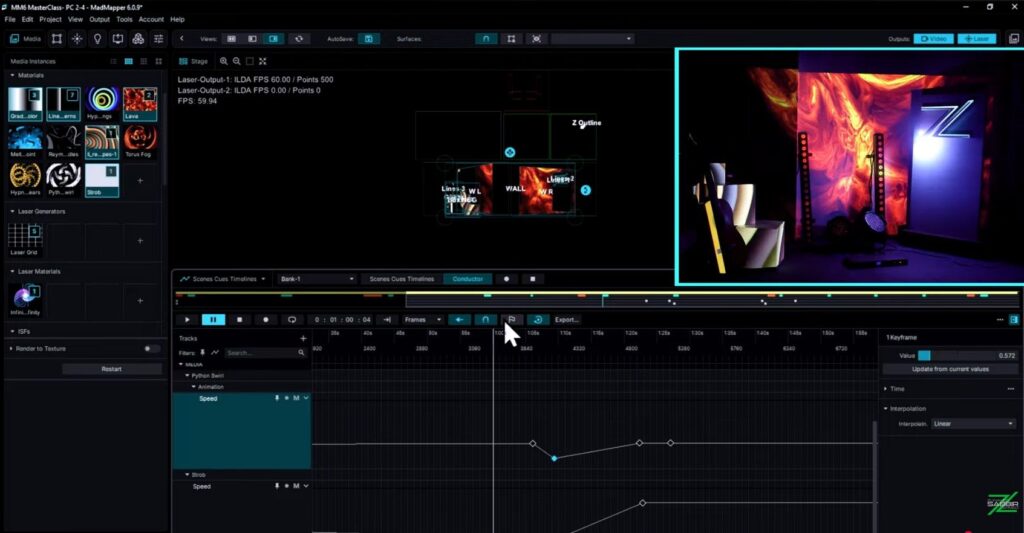
What the MadMapper 6 Timeline Actually Does
The timeline in MM6 is where you arrange your cues in sequence with precise timing. You define when each scene activates, how long it runs, and how it transitions to the next. You can build a complete show — forty minutes, ninety minutes, two hours — that plays from start to finish without manual intervention.
This is not just convenient. It is the professional standard. Any show that needs to sync to music, coordinate with live performers, or repeat consistently across multiple nights needs a timeline. Improvising at that scale is not a workflow — it is a risk.
The Conductor and Keyframe Editing — Why These Matter
Two MM6 features that look small on paper but are enormous inside a real show: the conductor and keyframe editing.
The conductor gives you macro-level control over your timeline — tempo-syncing, master playback control, the ability to shift the entire show’s timing without rebuilding cue by cue. For live event work, where the show often needs to flex slightly around live performers or technical delays, this is critical.
Keyframe editing gives you granular control over how parameters change over time — opacity, position, effects intensity. Instead of a hard cut between states, you get smooth, controlled transitions that you can define precisely. These two features together are what push MM6’s timeline from functional to professional-grade.
Why Timeline Level 2 Gets Its Own Hour in the Masterclass
In the MadMapper 6 Masterclass, the final chapter is nearly a full hour on its own. That is because we built a complete timeline-based show from scratch — recapping every skill from the course and putting it all together into a real deliverable.
Most MadMapper resources touch timeline briefly and move on. That is exactly the wrong approach. Timeline is not a feature you visit — it is the framework around which a professional show is built. Getting a dedicated hour on it, in context, after you have already learned everything that feeds into it, is the right sequence.
What most people get wrong about timeline: they try to learn it before their scenes and cues are solid. Timeline is not where you discover your project structure — it is where you execute a structure you have already built. Get your scenes right first. Then bring them into the timeline with confidence.
A Simple Framework to Start With
If you are approaching MadMapper 6 timeline for the first time, start here:
- Build three to five clean scenes in your project first. Know what each one does.
- Create cues to move between them. Test each transition manually.
- Only then open the timeline and start placing those cues in sequence.
- Add timing. Add keyframes for transitions you want to smooth out.
- Play the whole sequence. Fix what breaks. Repeat until it is show-ready.
Show-ready, to me, means tested enough in the studio that nothing surprises you live. The timeline is what makes that possible.
I am a certified MadMapper trainer recognized by MadMapper directly. If you want to go from basic scenes to a full timeline-based show in a structured, sequential way — that is exactly what the Masterclass delivers.